Monday 27 December 2021

Jukebox

 Hi!  The blog has been a bit quiet this last week or two as my design teams are on a break and so am I!  Hopefully, I'll feel inspired to create just for the fun of it.

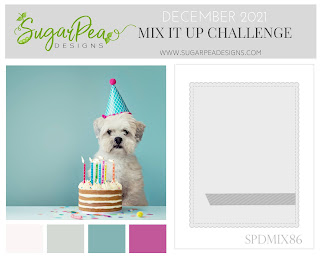
This card was made using both the photo and the sketch at SugarPea Designs.  And can I say, it took forever to pull together!  I started this a week ago by putting together the jukebox and it just didn't look right - maybe because the body is white and I've never seen a white jukebox?  Anyways, I persevered and created this simple card.


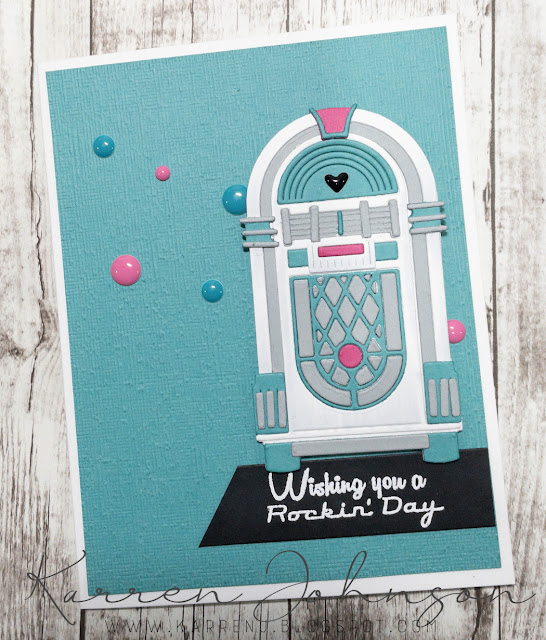
To try and tone down the white and give it some dimension, I added some subtle shading with gray Copic markers, but it's hard to see in the phot.

The card base is white, with a panel of Caribbean Sea cardstock, embossed with the Subtle embossing folder.  The sentiment is white-embossed onto black and the jukebox is popped up on foam tape.

To finish the card, I added some enamel dots from Altenew to match the pink and teal colours.


Thanks for visiting.

Products used:

Stamps:  Jukebox Jive (Sugarpea Designs)
Ink:  Versamark
Cardstock:  White, Black, Caribbean Sea, Ripe Raspberry (MFT), Dove (C+9)
Dies:  Rock n Roll Jukebox (Sugarpea Designs)

Cheers
Karren

Thursday 16 December 2021

Celebrating My Boy

 Hi and welcome!  Our sketch hostess this week over at Freshly Made Sketches is Narelle Farrugia and she has a great sketch for us.  Here's what I did with it:


I had need of a birthday card for my son, who would have been turning 24 this week.  Even though he's not here anymore, I still make him a birthday card, like I did for nearly all of the 21 years he was here (I started card-making seriously when he was about 4).

Instead of circles, I had the idea to use triangles for the card and then came the challenge of choosing colours.  Originally I went with various shades of gray/blues but it looked too dull, so I pulled out a new Altenew colour, Tanzanite and paired that with Enchanted Gold.

After stamping and die-cutting the triangles, I stamped the sentiment and then covered it with a scrap of paper before flicking on some Enchanted Gold ink and some blue/gold paint.


I arranged the triangles, popping some up with foam tape and then finished the card with some clear droplets.


Thanks for visiting.  I hope you'll check out the wonderful cards made by the rest of the design team.

Products used:

Stamps:  Triangle Pattern Builder, Art Deco (Neat & Tangled)
Ink:  Versafine Onyx Black, Tanzanite, Enchanted Gold (Altenew)
Cardstock:  White
Dies:  Stitched Rectangle Stax (MFT), Triangle Pattern Builder (Neat & Tangled)
Accessories:  Clear Droplets

Cheers
Karren


Thursday 9 December 2021

Rich Poinsettia

 Hi and welcome!  It's my turn to hostess over at Freshly Made Sketches and here's the card I made:


To be honest, I made this card weeks ago and then decided to base my sketch around it.  One day I just felt like Copic-colouring so I coloured up this poinsettia border and then just kept on going with gold hot foil and some fussy-cutting until this was the finished product.

The hot-foiling was used for the stripes on the red panel as well as the over-sized sentiment.  I think the sentiment looks quite cool how it merges with the focal point.


So, that's my card and my sketch.  I hope you head over to check out how the rest of the DT have interpreted my sketch.  Thanks so much for visiting!


I'm also going to enter this in the current Flower Challenge, where the theme is Christmas.  I was inspired by the Christmas theme and the colours at The Card Concept for my Clean and Layered card and by the Tic-Tac-Toe challenge where I went with Glitz/Free/Christmas.


Products used:

Stamps:  Poinsettia Border (SSS/Paper Rose)
Ink:  Amalgam (Gina K)
Cardstock:  Fog (SSS), Amarena Cherry (MFT), X-Press It, Gold Hot Foil
Dies:  Skinny Stripe Background, Stylish Script Merry Christmas (Spellbinders)
Accessories:  Copics

Cheers
Karren

Edited to Add:  This card got a shout out at Card ConceptTic Tac Toe and The Flower Challenge.


Thursday 2 December 2021

Shaker Joy

Hi!  Today's card uses Cecile's sketch from Freshly Made Sketches newest challenge and I decided to make a shaker card.  


My original intention was to use the circle in the centre for the shaker element, but then I decided to make my first edge-to-edge shaker card.  

I started by adhering some patterned paper to a square panel and then added some stamp packaging over the top, chucking in some sequins before sealing the fourth edge.  I then adhered that to a white card base.

For the circle element on the sketch, I deviated somewhat and added the word "Joy" in gold foil cardstock.  The "to the world" is hot foiled.  


For the snowflakes I die-cut three different ones from both white glitter cardstock and some deep pink and adhered them together, slightly offset for a shadow effect.

And that's my card.  Thanks so much for visiting.  I hope you'll check out the wonderful cards made by the DT.


Products used:

Cardstock:  White, Gold Foil, White Glitter, Autumn Rose (PTI), Blurry Flurries (Whimsy Stamps)
Dies:  Let It Snowflake Too, Filled With Joy (MFT), Holiday Sentiment Series 2 (Spellbinders)
Accessories:  Gold Hot Foil, Sequin Mix (Hero Arts)

Cheers
Karren

Friday 26 November 2021

Gray and White Star

 Welcome to the last Fusion challenge of 2021.  I played with the colours from the photo and also pulled in the general theme of the sketch to come up with this card.


I had just received this Fancy Star Builder stamp set and wanted to try it out, so I grabbed some gray inks and a panel of white cardstock and just had fun.  Once I'd stamped the stars, I cut the panel with a frame die and then embossed the sentiment into the centre piece.

To put the card together, I took a Fog card base and adhered the outer most stamped layer directly to that.  I then used two layers of foam adhesive for the frame and a single layer for the centre piece, so they're all at different heights, which is hard to see in the photo.

I finished with some gray star enamel accents and called it done.

I hope you'll check out the wonderful cards made by the design team and find time to play along with us.

Products used:

Stamps:  Fancy Star Builder (Altenew)
Ink:  Rock Collection, Gentleman's Gray set (Altenew), Versamark
Cardstock:  White, Fog (SSS)
Dies:  Nesting Rectangle Frames (Waffle Flower)
Accessories:  Liquid Platinum EP (Ranger), Rock Collection Enamel Dots

Cheers
Karren

Thursday 25 November 2021

Poinsettia Bouquet

Welcome to my blog!  Today's card is for the latest Freshly Made Sketch challenge, where our hostess this week is Jen Brum.  I made another Christmas card, purely because I just received some washi tape that I wanted to try out!


I had previously purchased the stamp set, stencils and die that match this washi and didn't buy the washi, but decided it makes for quick and easy cards, so added it to my next order.  Of course, I had to test it out when I received it and this card uses one of the die-cut elements from that test session.  I added a matte gold strip of cardstock under the bouquet, a small and simple sentiment and some subtle dry embossing using the Subtle EF and finished with some Copic-coloured pearls.  All done!


Thanks so much for visiting.  I hope you'll check out the wonderful cards made by the rest of the design team.

Products used:

Stamps:  Poinsettia Border (SSS/Paper Rose)
Ink:  Versafine Onyx Black
Cardstock:  White, Gold Matte
Dies:  Poinsettia (PinkFresh Studio), Slanted Sentiment Strips (MFT)
Accessories:  Poinsettie Washi (PinkFresh Studio), Pearls, Subtle EF

Cheers
Karren


Sunday 21 November 2021

Triangular Hello

 Hi!  I had a bit of extra time today so decided to make a card for a few challenges.  Color Hues is looking for Gold and Silver, Time Out Challenges has a quote (where I think I've covered the "simplicity" and "sophistication" aspects) and Happy Little Stampers Anything Goes with Dies challenge.


For this card I created a background panel using the Deco Triangles Hot Foil Plate and some vintage matte gold foil.  Once it was foiled, I die-cut it with a stitched rectangle die and matted it to a black panel.  

For the sentiment, I die-cut the Hello word twice from black and once from silver foil cardstock and layered them together.  I used the negative die-cut to align it on the hot foiled panel.

To finish the card, I white-embossed a sub-sentiment and added it under the Hello.


Thanks so much for visiting!


Products used:

Stamps:  Lots of Hugs (MFT)
Ink:  Versamark
Cardstock:  White, Black, Silver Foil
Dies:  Big Hello, Stitched Rectangle Stax (MFT), Deco Triange Hot Foil (The Greetery)
Accessories:  Vintage Gold Hot Foil, White EP

Cheers
Karren


Thursday 18 November 2021

Golden Snowflake

 Just a quick post today as I'm rushing out the door!  This card uses the latest sketch from Freshly Made Sketches where our hostess is Kim Singdahlsen.  I went for a quick and easy washi tape card to come up with this:


The navy and gold washi tapes are from Altenew and I applied strips above and below the gold-embossed sentiment, before adhering the panel to a white card base.  The gold snowflake was made from white cardstock covered in gold washi and the navy snowflake was made with cardstock.


And that's it!  Clean, simple and elegant.  Thanks for visiting.  I hope you'll check out the cards made by the rest of the design team.
Products used:

Stamps:   Abstract Holiday (SSS)
Ink:  Versamark
Cardstock:  White, In the Navy (Gina K Designs)
Dies:  Rizza, Lindeman (Memory Box), Stitched Rectangle Stax (MFT)
Accessories:  Gold Foil Washi, Navy Gold Trim Washi (Altenew), Antique Gold EP (SSS)

Cheers
Karren


Saturday 13 November 2021

Christmas in Non-Traditional Colours

 Hello and welcome!  I was thrilled when Jeanne Jachna asked me to be a guest for the monthly Waffle Flower challenge.  The theme is non-traditional colours which I was so excited with as red and green is not my favourite colour combo 😄


To top it off, we get to use gorgeous Waffle Flower products.  I had a hard time narrowing my choices down for my card and actually ended up making three cards - although one is a bonus of another.  

Anyway, enough chatter, let's get to the cards.  


For my first card, I wanted to focus on the gorgeous and modern Spotlight Holiday Elements stamp set.  I decided to create my own background using various monochromatic inks and a home-made stencil (and I have a video showing how I did this, if you're interested).  After I made my panel and let it dry, I positioned the berry branch image and sentiment in my Misti and stamped it with Versafine Onyx Black ink.  Without moving the stamp, I then placed a white card base into the Misti and stamped the same image.

Using Waffle Flower's Nesting Rectangle Frames die, I die-cut a frame from the ink-blended and stamped panel and carefully removed it.  I then adhered the outer and inner pieces left from the ink-blended panel to the white card base, being careful to match the stamping with what was on the card base.  It helped to use the die-cut frame as a placement guide and then removing it after the other pieces were placed.  The outer frame was adhered directly to the card base and the inner piece was popped up on foam tape for some added dimension.


To use the leftover die-cut frame, I stamped a second white card base with the berry branch image (having left it in the Misti, I knew it was going to be in the correct position).  I added liquid glue to the frame and adhered it, again aligning the image.  As this card was going to be posted, I didn't add dimension, but this would look cool with foam tape behind the frame.


To finish both cards, I added gray enamel dots to the inner frame card and white enamel dots to the outer frame card.  But I wasn't finished there - I had so many wonderful products to play with, I made another card using the same ink-blending technique but with a completely different result.


For this card, I used yellow, orange and pink inks to create my background.  I then die-cut the gorgeous Mistletoe Panel Die three times from white cardstock and once from the Modern Neutrals Pattern Paper (be still, my heart!). I layered all together and adhered them to the inked panel.  I then stamped and Copic-coloured the candy image from Christmas Tag Elements using a similar colour scheme.  After die-cutting the image and stamping and die-cutting the sentiment from Wonderful Christmas, I added both to the card front.  Finally, I added the panel to a white card base and finished with some enamel dots in matching colours.

Phew!  This was a long post!  Thanks for sticking with me.  And thanks also to Jeanne for inviting me and to Waffle Flower for their generosity (not to mention fabulous products).  If you want to see how I made my ink-blended panel check out the video below or over at my YouTube channel.


Products used (gray cards):

Stamps:  Spotlight Holiday Elements (Waffle Flower)
Ink:  Versafine Onyx Black, Unicorn White (Hero Arts), Pumice Stone, Smoked Hickory, Black Soot Distress Oxide Inks
Cardstock:  White, Bristol Smooth
Dies:  Nesting Rectangle Frames Die (Waffle Flower)
Accessories:  Enamel Dots

Products used (pink/orange card):

Stamps:  Christmas Tag Elements, Wonderful Christmas (Waffle Flower)
Ink:  Versafine Onyx Black, Amalgam (Gina K), Scattered Straw, Spiced Marmalade, Tattered Rose, Worn Lipstick Distress Oxide inks, Unicorn White (Hero Arts)
Cardstock:  White, Bristol Smooth, X-Press It, Modern Neutrals (Waffle Flower)
Dies:  Christmas Tag Elements, Wonderful Christmas, Mistletoe Panel die (Waffle Flower)
Accessories:  Copics, Spectrum Noir Clear Sparkle Pen, Enamel Dots

Cheers
Karren


Friday 12 November 2021

Sparkly Snowflake

Hi and welcome to the second-to-last Fusion challenge for the year.  Today I chose to primarily play along with the sketch but also pulled in a couple of colours from the photo.
 

There's lots of glitter paper on this card so it's very sparkly!  To make this card, I die-cut the silver glitter panel first using the Circle Trio Shaker dies and then used those cut-outs to position the snowflake die on the white panel.  The snowflake die cuts out the snowflake from the main panel leaving behind the negative space which is a cool look.  I then cut the outer frame circle 9 times and stacked three together to create three circles.

I stamped the sentiment and then assembled the card, placing some blue sparkle paper behind the snowflake cut-outs.


Thanks so much for visiting.  I hope you'll check out the wonderful cards made by the rest of the design team.


Products used:

Stamps:  Merry Mistletoe (SSS/Avery Elle)
Ink:  Versafine Onyx Black
Cardstock:  White, Silver Sparkle, Blue Sparkle (MFT)
Dies:  Circle Trio Shaker (MFT), Christmas Circle Cutouts (Impression Obsession)


Thursday 11 November 2021

Poinsettia Greeting

I'm here with a new challenge from the team at Freshly Made Sketches where our hostess this week is Linda Callahan.  I made another Christmas card with some new goodies from PinkFresh Studio.
 

The flowers were stamped and coloured using layering stencils then die-cut.  I die-cut a postage frame and gold-embossed the sentiment before adding the panel with foam tape to a Fog card base I'd dry-embossed with the Subtle embossing folder.


I added the poinsettia images and finished by colouring the flowers with clear sparkle pen and adding some pearls I coloured with a Copic marker.


Thanks for visiting.  I hope you'll check out the rest of the DT cards - they're fabulous!

Products Used:

Stamps:  Poinsettia (PinkFresh Studio)
Ink:  Amalgam (Gina K), Red Cosmos, Martian Terrain, Tropical Forest sets (Altenew)
Cardstock:  Fog (SSS), White
Dies:  Poinsettia (PinkFresh Studio), Postal Frames (The Greetery)
Accessories:  Poinsettia stencils (PinkFresh Studio), Antique Gold EP, Pearls, Spectrum Noir Clear Sparkle Pen


Thursday 4 November 2021

Circle Thanks

Welcome to my blog!  It's time for another Freshly Made Sketches challenge where this week our hostess is Jen Mitchell.  She has given us lots of layers to play with.


My card didn't photograph well - I think it might have been the foiling but trust me, it's white!  I hot-foiled some silver foil onto a panel using the Slimline Confetti die and added that to a white card base.

The "thanks" die doesn't cut the outside edge, so I took a slightly larger circle die and taped them together before die-cutting three times from white cardstock.  I then stacked them together and added it to my card.


And that's it!  Thanks so much for visiting.  Please head over and check out the DT cards.


Products used:

Cardstock:  White, Silver Hot Foil
Dies;  Circled Greetings:  Thanks (Altenew), Infinity Circle Dies (Hero Arts), Infinity Rectangle Dies (Hero Arts), Slimline Confetti (Spellbinders)


Friday 29 October 2021

Pink Thank You

 Hi!  It's time for a new Fusion challenge and I created a fusion this week to come up with this card:


Whenever I see a typewriter image, I'm always drawn to my SugarPea Designs stamp and die set.  I love the wee typewriter and this time I used pink, cream and black from the photo to create my typewriter.  I adhered it with foam tape to a black die-cut circle and then prepared my card base.  Onto the cream base I added the pink panels onto which I'd heat-embossed the sentiment and then run through with an embossing folder to provide some texture.


I finished with some clear sparkle pen on the heart and inside of the typewriter.

Thanks so much for visiting!  I hope you'll check out the rest of the DT cards.


Products used:

Stamps:  You're My Type (SugarPea Designs), Thank You (Waffle Flower)
Ink:  Versafine Onyx Black
Cardstock:  Cream (SSS), Bubblegum, Black Licorice (MFT)
Dies:  You're My Type (SugarPea Designs)
Accessories:  Clear EP, Tasteful Texture EF (SU), Spectrum Noir Clear Sparkle Pen

Cheers
Karren


Thursday 28 October 2021

Elf Trio

Hi!  Jennifer Timko created this week's sketch over at Freshly Made Sketches and as soon as I saw the trio of squares, I knew what I wanted to do.  So I took some time and just coloured and this is the result.


I arranged the three stamps and sentiment in my Misti and stamped them all at once onto a strip of X-Press It cardstock.  I then chose the colour scheme I wanted and spent some time colouring.  I did intend the pink to be a bit lighter but it's all good.  Once I was finished colouring, I adhered the panel to a card base of Blu Raspberry cardstock.


I finished by adding some clear Stickles to the pink ornament and the reindeer's nose.


Thanks for visiting!  Please check out the fabulous cards made by the rest of the design team.


Stamps:  Christmas SELFies (MFT)
Ink:  Amalgam (Gina K.)
Cardstock:  Blu Raspberry (MFT), X-Press It
Accessories:  Copics, Stickles

Cheers
Karren


Wednesday 27 October 2021

CASE Me a Christmas Card - Smooshed Poinsettia


Hi!  I'm thrilled to have been asked again this year to join Michelle Lupton in her annual CASE Me a Christmas Card challenge.  The premise of this challenge is that we each choose a card of the other's and CASE it, putting our own spin on it.

I went with a "get well soon" card made by Michelle and turned it into this Christmas card.  Scroll down to the bottom of this post to see the photo of Michelle's card, taken from her blog.


The elements I carried over to my card include the ink-smooshing technique, the peachy colour palette, the white embossing - although I did mine on the background and not the image, the floral theme and the black sentiment.


To make this card, I started by white embossing the background stamp onto watercolour paper and then smooshed various distress oxide inks onto watercolor cardstock, using an acetate sheet for the ink transfer.  I created a second smooshed panel for the poinsettia.  Once the panels were dry, I die-cut the poinsettia from the second panel and used some watercolor wash patterned paper for the leaves. I then used Coral Crush and Harvest Gold cardstocks to die-cut the tags and Harvest Gold for the centre of the flower.

I added the tags at an angle to provide a separation between the smooshing and also to add a bit more interest.  I then added the poinsettia and sprayed the petals and leaves with shimmer spray.  Finally I added the sentiment which was stacked three high.  


And now, here is Michelle's gorgeous card that I used as my inspiration.


Thanks so much for visiting.  Please make sure you head over to Michelle's blog and check out her card.  I can't wait to see which of my cards she has chosen and how she has adapted it.


Thank you, Michelle, for inviting me to join in once again.  This is such a great concept and I enjoy it every year.

Products Used:

Stamps:  Outline Merry Christmas BG (SSS), Wonderful Christmas (Waffle Flower)
Ink:  Versafine Onyx Black, Versamark, Scattered Straw, Tattered Rose, Worn Lipstick, Spiced Marmalade, Mustard Seed, Abandoned Coral Distress Oxide Inks
Cardstock:  White, Bristol Smooth, Watercolor, Watercolor Wash Brights, Coral Crush (MFT), Harvest Gold (PTI)
Dies:  Perfect Poinsettia (MFT), Tag Me (Reverse Confetti), Wonderful Christmas (Waffle Flower)
Accessories:  Shimmer Spray, White EP

Cheers
Karren