Saturday, 28 July 2018

Fabulous

Hi!  Ever have one of those days where nothing crafty turned out right or easy?  Yep, that was me today.  I look forward to Saturdays so much, because as well as being the weekend, it's also the day that I dedicate a few hours to crafting - making my upcoming DT cards and also, hopefully, playing along in a challenge or two. 

Well today, everything was hard work.  My cards aren't horrible (at least I don't think so πŸ˜€) but it didn't go smoothly, they didn't come out as I envisaged and they took way too long. 

Anyway, enough of the pity party!  Here's the card I made for the latest sketch challenge at MFT.  I've said it before, but angled panels make me twitchy and I really, really want to straighten them, but I didn't and here's my card.


It's been a while since I did any ink blending so I decided to create a sunset behind this cute flamingo.  Originally, I masked a circle on a white card base and ink-blended inside the circle.  That looked fine, so I removed the mask and then thought to darken up a couple of areas.  Yup!  Without the mask!  Doh! 

To fix that problem, I die-cut the circle from the card base, darkened up where I wanted to and then glued it down to another card base.  I stamped, colored and die-cut the flamingo and set him to one side while I white-embossed the sentiment onto black cardstock.  I die-cut the sentiment with a die from Blueprints 29 which has stitching at either end, but you can't see that in the photos.


Finally, I added the flamingo, then I colored all the pink areas with a clear sparkle pen and added a dot for his eye with a black glaze pen.


Thanks for visiting and reading through all my woes 😁It's getting on for Saturday evening now, so I think I'll do some coloring practice.


Products used:

Stamps:  Let's Flamingle (MFT)
Ink:  Extreme Black (MFT), Versamark, Salty Ocean, Faded Jeans, Abandoned Coral, Spiced Marmalade, Wild Honey, Squeezed Lemonade Distress Oxide Inks
Cardstock:  White, Black, X-Press It
Dies:  Let's Flamingle, Blueprints 29 (MFT), Circle Infinity Dies (Hero Arts)
Accessories:  White EP, Spectrum Noir Clear Sparkle Pen, Black Glaze Pen

Cheers
Karren

Thursday, 26 July 2018

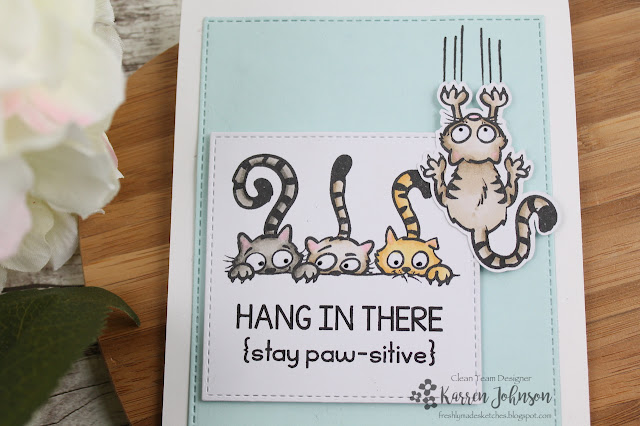
Stay Paw-sitive


Hi!  It's time for the team at Freshly Made Sketches to wow you with their creativity πŸ˜„and this week we have a fabulous sketch from Kim Singdahlsen


So I went with a NBUS set to make my card and I hope you can see the sketch!  


I stamped the trio of cats onto a piece of X-Press It and quickly colored them with Copics.  I added the sentiment and die-cut the panel with a stitched square die.  The single cat was stamped, colored and cut with my Scan n Cut.  I used the same die set to cut a panel of Sno Cone cardstock and then after working out where my stamped images would be placed, I stamped the scratch marks.  


Both the trio of cats and the single cat were popped up on foam tape then added to the card base.  And that's my card for this week!  I hope you'll head on over and check out the fabulous cards made by the rest of the DT.


Products used:

Stamps:  Scratch Pad (Your Next Stamp)
Ink:  Black Licorice Hybrid, Versafine Onyx Black
Cardstock:  White, X-Press It, Sno Cone (MFT)
Dies:  Inside/Out Stitched Squares, Stitched Rectangle Stax (MFT)
Accessories:  Copics, Black Glaze Pen

Cheers
Karren


Saturday, 21 July 2018

Little Chef

Hi and welcome!  I had some time today to make a card for a few of my favorite challenges - MFT Sketch Challenge and Color Throwdown and the Anything Goes challenge at Addicted to Stamps and More.

I've been wanting to use my Recipe for Happiness set again for a while now as this little chef is too cute to sit languishing in my stamp collection.  So today was the day!


I decided to take the four squares from the sketch and turn them into a window with the help of MFT's Classic Windows die.  Onto a white top-folding card base I masked out the centre of the window and sponged over the English Brick Wall stencil with Grout Gray ink.  I then masked the brick wall stenciling and stenciled the clouds with the Mini Cloud stencil.

The window components were cut with Cement Gray and Blueberry cardstock.  I also added some acetate behind the window panes.  The sentiment was white-embossed onto a black strip cut with the Slanted Sentiment Strips die.

Finally, I stamped and colored the little chef and then die-cut him with the co-ordinating die.  He is popped up on foam tape and grounded on the sentiment strip.   And I know you generally have shutters on the outside of windows, but these were too cute not to use πŸ˜„


Thanks for visiting!


Products used:

Stamps:  Recipe for Happiness (MFT)
Ink:  Black Licorice Hybrid, Versamark, Sno Cone, Grout Gray (MFT)
Cardstock:  White, Cement Gray, Blueberry, Black Licorice (MFT), X-Press It, acetate
Dies:  Recipe for Happiness, Classic Windows, Slanted Sentiment Strips (MFT)
Accessories:  Copics, Mini Cloud Edges Stencil, English Brick Wall Stencil (MFT)

Cheers
Karren


Friday, 20 July 2018

Hello Peony


Hi all!  Thanks for visiting!  It's time for another Fusion Challenge and I'm particularly partial to both the sketch and the photo, and I really like my card, which doesn't happen all the time πŸ˜„


I created a fusion this week, pulling in the wood and the pinks and greens from the photos.


I stamped and colored this beautiful peony image (yes, it is from the same set I used in yesterday's FMS card!) and cut it with my Scan n Cut.  The rest of the card was really simple - just some die-cut patterned paper and a sweet scripty sentiment.  I did film the making of this card which you can see below or over on YouTube.


To watch the making of this card, head over to YouTube or watch below.


I'm linking this up to the latest Simon Says Stamp Wednesday Challenge to use a die or punch.  I used dies for the gingham papers.


Products used:

Stamps:  Peony Blooms (Newton's Nook)
Ink:  Black Licorice Hybrid, Versafine Onyx Black
Cardstock:  White, Homespun Gingham (MFT), Wood & Notebook Basics (Sn@p Basics)
Dies:  Lil Inkers Anytime Tags, Stitched Circles
Accessories:  Copics, Prismacolor Pencils

Cheers
Karren

Thursday, 19 July 2018

Red Peony


Hi and welcome!  It's time for another challenge from the team at Freshly Made Sketches and this week our hostess is the wonderful Linda Callahan.  Check out her fun sketch:


I took a few liberties with Linda's sketch but I hope you can sort of see it - if you close one eye and squint through the other, that is πŸ˜„


The two circles in the top are represented by the peony and the bud and the two leaves at the bottom are the bottom circle.  I colored the images with Copics and Prismacolor pencils and then cut them with my Scan n Cut.  They were then adhered to a white panel, cut narrower than card base size.  I added the sentiment then put it to one side.  

The black panel was stenciled with the Bubbly stencil and Licorice Glitter Embossing Paste.  Once it was dry, I adhered it to a white top-folding card base.  


I glued a thin strip of Limelight cardstock onto the side of a main image panel and after adding some craft foam, I adhered it to the card base.  Finally, I colored the flower with clear sparkle pen.

Here's another angle so you can see the stenciling.  


Thanks for visiting!  The DT have some gorgeous cards, so be sure to check them out.  I'm linking this card to the color challenge at Inky Paws.


Products used:

Stamps:  Peony Blooms (Newton's Nook)
Ink:  Black Licorice Hybrid, Versafine Onyx Black
Cardstock . White, Black, Limelight (MFT)
Accessories:  Copics, Spectrum Noir Clear Sparkle Pen, Bubbly Stencil (Newton's Nook), Licorice Glitter Paste (Bo Bunny)

Cheers
Karren

Edited to Add:  This card got a shout out at Inky Paws Challenge.

Saturday, 14 July 2018

Lemonade

Hi!  Yes, I have been a prolific blogger this week - blame a week off work for that!  Apologies for filling up your inbox.  It's back to work on Monday though, so I'll be back to my usual 1-2 posts per week after that.

But... as I mentioned in my recent post, it's been great to play along in challenges I don't usually get time to play in.  Todays cards (yes, two!) are for one of those challenges.  It's Darnell's Twofer Challenge and this month the theme is beverages.  Now, for unknown reasons, this challenge really scares me - I never, ever make two cards at the same time using the same stamps and I really had to step outside my comfort zone πŸ˜….  These cards actually took me most of the morning - including the hour I spent going through all my stamps trying to find inspiration.  I hope they aren't too similar for the challenge.  In hindsight, I should have made one lemon and one orange πŸ˜„but I did color one with Copics and one with Zigs, if that helps?


So for the first card, I used the sketch at SugarPea Designs and the colors from Cupcake Inspirations.


I colored the images with Zigs and the embossing powder is Crushed Curry from Stampin' Up.  Here's a close up of the card:


I dry-embossed a 3D embossing folder onto a die-cut white panel before adhering it to the card base.  The sentiment is die-cut with a jumbo flag die, which I extended to fit the sentiment.

For my second card, I went with a thanks theme and I'm also linking up to 4 Crafty Chicks.


These images were colored with Copics.  Onto the white card base, I sponged over the Bubbly stencil with Mustard Seed and Squeezed Lemonade distress inks.  I then stamped the sentiment in Versafine Onyx Black ink and added the images.  The lemon squeezer and glass are popped up on foam tape.  


I finished both cards with some Sparkling Clear Confetti.

Here are the various colors I used for the images.


Thanks for visiting!

Grab our Badge!


Products used:

Card 1:

Stamps:  Pucker Up (SugarPea Designs)
Ink:  Versafine Onyx Black, Versamark
Cardstock:  White, Black, Bristol Smooth
Dies:  Mod Rectangle Stax, Jumbo Fishtail Flag Stax (MFT)
Accessories:  Zigs, Crushed Curry EP, 3D Texture Fades EF (Lumber), Sparkling Clear Confetti

Card 2:

Stamps:  Pucker Up (SugarPea Designs)
Ink:  Black Licorice Hybrid, Versafine Onyx Black, Squeezed Lemonade, Mustard Seed Distress Inks
Cardstock:  White, X-Press It
Accessories:  Copics, Bubbly Stencil (Newton's Nook), Sparkling Clear Confetti

Cheers
Karren

Edited to Add:  This card got a shout out at 4 Crafty Chicks and Cupcake Inspirations.

Friday, 13 July 2018

Pink Baby

Hi!  This is my last day of a week off work 😒and in between taking my newly-licenced son for driving lessons (like 3x a day!), I've been in my craft room.  It's been so good to actually play along with a few challenges that I just don't get time to play with in my usually limited crafting time.  One of those challenges is Addicted to CAS - every fortnight I see the new cue word and want to play along and before I know it, the challenge is closed and I've not made a card.

Another challenge I haven't played with in ages is City Crafter.  I decided to combine these two challenges into the card below.


The cue word at Addicted to CAS is Baby and City Crafter are looking for pink, flamingoes, wooden blocks, hello or phones.  I went with pink, wooden blocks and hello.  This set is NBUS called Hello Little One by MFT Stamps.  I don't know anyone having babies but it's always good to have a couple of baby cards on hand.  I stamped and colored the images with Copics and cut them with my Scan n Cut.  For a bit of fun, I added some white dots onto the baby pram using a white gel pen.

On a white top-folding card base I lightly sponged some Spun Sugar and Worn Lipstick distress inks.  I stamped the sentiment in Black Licorice Hybrid ink and then added the images.  The blocks are popped up on foam tape.  


To finish the card, I added some Nuvo Crystal Drops in White Blizzard and colored the blocks with clear sparkle pen.  


Thanks so much for visiting!  I have another card I made this morning, so I might end up with two posts today, depending on how organised I am πŸ˜„


Products used:

Stamps:  Hello Little One (MFT)
Ink:  Black Licorice Hybrid, Spun Sugar, Worn Lipstick Distress Inks
Cardstock:  White
Accessories:  Copics, Spectrum Noir Clear Sparkle Pen, Nuvo Crystal Drops (White Blizzard), White Gel Pen

Cheers
Karren

Edited to Add:  This card got a shout out at Addicted to CAS.

Thursday, 12 July 2018

Stay Awesome

Hi and welcome!

I love the colors at Color Throwdown this week, but for some reason I never like anything I make that uses kraft cardstock.  Anyway, I love gray and yellow so decided to push past my fear of kraft and make a card using the sketch at MFT Stamps, which is beautifully CAS.  I am using the tic-tac-toe board at Southern Girls Challenge (I went with bling-stamp-yellow).


I inked up this new-to-me stamp set (which has now been retired) and colored it with Copics.  I added some white gel pen dots to her dress to zhoosh it up a bit (she is in France, after all 😁). I die-cut the images with the co-ordinating dies and set it aside to work on my card base.

I stamped "Stay Awesome" from Essential Sentiments onto a strip of Desert Storm cardstock and added a thin strip of black underneath before adhering that to a white card base.  I then added the Eiffel Tower, moving it up the card a bit to appear further away, and finally the girl.  I colored her scarf and handbag with clear sparkle pen and also added some sparking clear confetti.


Thanks for visiting!


Products used:

Stamps:  Mon Cheri, Essential Sentiments (MFT)
Ink:  Black Licorice Hybrid
Cardstock:  White, Black, Desert Storm, X-Press It
Dies:  Mon Cheri (MFT)
Accessories:  Copics, Sparkling Clear Confetti (Pretty Pink Posh), White Gel Pen, Spectrum Noir Clear Sparkle Pen

Cheers
Karren

Edited to Add:  This card got a shout out at Southern Girls Challenge.

Plaid Birthday

Hello!  Thanks for popping by!  Today's card is for the current challenge at Freshly Made Sketches - designed by none-other than our co-Camp Mum Jen Mitchell.  Jen has got a very interesting sketch for us with lots of room for interpretation.

I decided that those angled panels would be good for a die-cut sentiment, so I went hunting through my dies to find two big dies that say "happy birthday". 


I also wanted to do some stenciling with embossing paste in the background.  I love my stencils but I mostly use them with ink-blending so I wanted to get out the embossing paste and add a touch of color to it.  I filmed the making of this card if you're interested - link down below.

So I colored my embossing paste with Hickory Smoke Distress Ink and then appied it over the Plaid #1 stencil from Carta Bella to a panel of white cardstock cut with a stitched die down one side.  Once that was dry, I added the die-cut sentiment and popped the whole panel up on craft foam for some added dimension.  No embellishments as this is a masculine card.  


All in all, a very quick card (for me!) . You can watch the video over on YouTube or below.


Products used:

Ink:  Hickory Smoke Distress Ink
Cardstock:  White, Black, Cement Gray (MFT)
Dies:  Happy Trio, Happy Birthday (WPlus9) Basic Stitch Lines  (MFT)
Accessories:  Embossing Paste