Wednesday 28 December 2022

Dainty Rings

 Hi!  Despite my intentions of cranking out heaps of cards while I was off work over the holiday period, I have actually not spent a lot of time in my craft room as I de-stress from the year that was.  But this morning I wanted to make a card for the Altenew Year in Review challenge and came up with this card using the March challenge photo.


I have so many Altenew floral sets that I didn't know where to start but as I was flipping through them, I came across this Dainty Bouquet set and thought it would work well with the colours.  To give the card a bit of added interest, I hot foiled the dainty rings onto the background, overlapping three of the rings.  I stacked the floral image with three other die-cut white layers for depth and added a gold-embossed sentiment.


I mounted the panel onto a light gray card base and finished with some enamel dots from the Pocketful of Sunshine set.

Thanks so much for visiting.

 
Products used:

Stamps:  Dainty Bouquet, Many Thanks (Altenew)
Ink:  Limestone, Buttermilk, Pumpkin Pie, Sea Forest, Mangrove Root (Altenew), Versamark
Cardstock:  White, Black, Fog (SSS)
Dies:  Dainty Bouquet, Fine Rings:  Circles (Altenew)
Accessories:  Driftwood Hot Foil, Gold EP, Pocketful of Sunshine Enamel Dots

Cheers
Karren

Thursday 15 December 2022

Sweetie Pie

 Hi and welcome to our last Freshly Made Sketch challenge for the year, where our hostess is Narelle Farrugia.  Here's the card I made with her sketch:


These dies come from two different sets and the sizing is a bit off between the pie knife and the pies, so I'm saying that these are individual little pies and not family-sized pies.  Okay? 😄

I made the pies with kraft coloured cardstock, some ink blending for the fillings and to make the crusts look cooked, clear embossing to make them look glazed and glass glitter to look like sugar.  Once they were assembled, I die-cut the pie knife from matte silver foil cardstock and stacked 3 together for stability.  I then silver-embossed the sentiment onto a strip of black cardstock.  The wee hearts were part of the same pie die set and were given the same treatment as the crust.


On a white card base, I hot-foiled a silver frame and then added all the elements to match the sketch.

Thanks so much for visiting, please check out the fabulous cards made by the design team.


Products used:

Stamps:  More Essential Sentiments (MFT)
Ink:  Versamark, Hazelnut, Almond Butter, Honey Drizzle, Maple Yellow, Snapdragon, Marigold (Altenew)
Cardstock:  White, Kraft, Black
Dies:  A2 Layers Hot Foil (Waffle Flower), Sky View Pies, Dish It Up (Spellbinders)
Accessories:  Clear EP, Silver EP, Glass Glitter (The Greetery), Silver Hot Foil

Cheers
Karren

Monday 12 December 2022

Golden Poinsettia

Hi and welcome!  Here is the second card I made for challenges this weekend.  This card has been made for The Flower Challenge, where Christmas is the theme.  I'm also linking up to the Card Concept challenge with this clean and simple card, focusing on the colours and Christmas theme.  As well, I'm linking this up to Darnell's NBUS challenge because everything but the frame is NBUS.


This is more NBUS - the October club kits from Spellbinders which only arrived this week.  I stamped and Copic-coloured the floral spray and die-cut it with the co-ordinating die.  For the card base, I hot-foiled a frame and a sentiment in matte gold hot foil.  I then popped up the flowers with foam tape and finished with some gold pearls.


It's hard to see in the photos, but for the centres of the flowers I "painted" them with Harvest Moon Mica Spray to give a lovely shine.


Products used:

Stamps:  Wonderful Christmas (Spellbinders)
Ink:  Amalgam (Gina K.)
Cardstock:  White, X-Press It
Dies:  Wonderful Christmas, Holiday Florals Background (Spellbinders), A2 Layers (Waffle Flower)
Accessories:  Harvest Moon Mica Spray, Spectrum Noir Clear Sparkle Pen

Cheers
Karren

Edited to Add:  This card got a shout out at The Flower Challenge.


Sunday 11 December 2022

Mistletoe and Berries

 Hi!  I had some time this weekend to make a few cards just for the fun of it and to play along in a few challenges and here is the first one.  I used the colours from Color Throwdown, the Christmas theme from Krafty Chicks and the Stencil and Christmas challenges from Happy Little Stampers.


This week was quite an exciting week as a few Black Friday orders arrived here in New Zealand, including an order from The Greetery, so I set to work with the Mistletoe Arches stamp and stencil and die sets to come up with this card.  


The mistletoe stencil was stenciled using three colours of green and two colour of red before being die-cut.  On the white card base, I used the arch stencil to sponge on some gold pigment ink, which unfortunately looks dirty in the photos, but it has a nice sheen in real life.  The sentiment was stamped in black ink and the Merry Christmas was gold embossed and die-cut.  I stacked it three deep to make it stand out a bit more.

Finally I added White Blizzard Nuvo Drops to each of the berries and popped the mistletoe up on foam tape.

Thanks for visiting!


Products used:

Stamps:  Arched Holiday Sentiments (The Greetery)
Ink:  Amalgam (Gina K.), Matcha, Sage, Spruce, Rouge, Peppermint Scrub (Catherine Pooler), Antique Gold (Altenew)
Cardstock:  White
Dies:  Arched Holiday Sentiments (The Greetery), Mistletoe Arches (The Greetery)
Accessories:  Gilded EP (Brutus Monroe), Mistletoe Arches Stencils (The Greetery), White Blizzard Nuvo Drops

Cheers
Karren

Edited to Add:  This card got a shout-out at Color Throwdown and Happy Little Stampers.

Thursday 8 December 2022

Snowy Village

 Hi all and welcome!  I'm the sketch hostess over at Freshly Made Sketches this week and I hope my sketch will provide a starting point for some amazing cards!  

For my card, I wanted to play with an ink-blended and Perfect Pearls background as well as some new silhouette dies I'd just received.


The background was created with Tumbled Glass, Peacock Feathers, Chipped Sapphire and Black Soot Distress Inks and then I brushed on some Blue Patina Perfect Pearls powder before splattering it with white gouache.  After I'd die-cut the black elements, I also splattered on some white gouache.  The snowy hills was die-cut from white cardstock and I stamped one of my favourite Christmas sentiment stamps from Papertrey Ink.


I adhered some of the silhouette elements to the front and back of the snowy hills and some directly to the ink-blended background panel, then I used foam tape to pop up the hills.

Thanks so much for visiting.  Please check out the wonderful cards made by the design team.

I'm linking this up to the Christmas creations challenge at Sweet Stampin' and the Winter/Holiday challenge at Time Out.


Products used:

Stamps:  Winter Village (PTI)
Ink:  Versafine Onyx Black, Tumbled Glass, Peacock Feathers, Chipped Sapphire, Black Soot Distress Inks
Cardstock:  White, Black, yellow scrap
Dies:  Winter Wonderland (Gina K), Stitched Slopes & Hills (SSS)
Accessories:  Blue Patina Perfect Pearls, White Gouache

Cheers
Karren

Edited to Add:  This card got a shout out at Sweet Stampin'


Friday 2 December 2022

Deer Greetings

Hi everyone!  I'm thrilled to be playing along with the Tic Tac Toe team this week as a guest designer.  We have a fun board to play with and I chose the left column - Snow/Animal/Frame for my Christmas card.


I had seen these gorgeous ink-blended background skies on Pinterest and wanted to create one for myself so I set to work with Distress Inks on a white panel.  Once the ink-blending was finished, I took a snowfall stencil and some white embossing paste and added the "snow".  Unfortunately my snow absorbed some of the ink colour so I have orange-ish snow (just lucky it's not yellow 😉)
 

While that panel was drying, I stamped and Copic-coloured my critters and cut them with my Scan n Cut.  Now if I'd just turned the stamp packet over, I'd have seen I had the co-ordinating dies.  Doh!


For the frame component, I took the Lawn Fawn Stitched Hillside Backdrop and cut it from white cardstock.  I stamped my sentiment from a WPlus9 stamp set and adhered the die-cut to the ink-blended panel with foam tape.  I then added the critters and some enamel dots to match the background.


Thanks so much for visiting and thanks to the Tic Tac Toe team for inviting me to play along.  I hope you'll head over and play along as there's lots of great choices in the board.

Products used:

Stamps:  Dashing Deer (MFT), Poinsettia Bouquet (WPlus9)
Ink:  Amalgam (Gina K.), Versafine Onyx Black, Tea Dye, Victorian Velvet, Aged Mahogany, Seedless Preserves Distress Inks
Cardstock:  White, X-Press It
Dies:  Stitched Hillside Backdrop Portrait (Lawn Fawn)
Accessories:  Copics, Snow Flurry Stencil (MFT), White Embossing Paste, Enamel Dots, white gel pen

Cheers
Karren


Thursday 1 December 2022

Silver Snowflakes

Welcome to my blog!  Today's card uses the latest sketch from the team at Freshly Made Sketches, where our hostess this week is Cecile Ribon.  I love Cecile's sketch and used it to create another Christmas card.


I white-embossed the snowflakes from the Blizzard stamp set onto a white panel as a background then silver-embossed some of them onto Dark Indigo cardstock and used the co-ordinating dies to cut them out.  For the circle element, I decided to use a circle frame die and cut it from matte silver foil.  I then arranged the snowflakes and a stamped and die-cut sentiment before adhering it all down to the white panel with foam tape.


I finished with some matte silver pearls and called it done!


Thanks so much for visiting.  Please check out the fabulous cards made by the rest of the design team.

I'm linking this up to the Tic-Tac-Toe challenge (December Holiday/Use a Die/Embellishment)


Products used:

Stamps:  Blizzard (Gina K. Designs)
Ink:  Versamark
Cardstock:  White, Dark Indigo (PTI), Matte Silver Foil
Dies:  Blizzard, Nesting Circle Frame Dies (Waffle Flower)
Accessories:  White EP, Silver EP, Silver Matte Pearls (Pink Fresh Studio)

Cheers
Karren

Saturday 26 November 2022

Cosy Christmas

 This is my last week as Guest Designer over at Just Us Girls and I've had a great time!  Thanks so much to the team for making me feel so welcome.  For this challenge, we have a photo inspiration and what a cosy photo it is!


I was drawn to the couch, the Christmas tree and the general colours of the scene.  I was also really drawn to the stag picture and wanted to re-create it somewhere on my card, but couldn't find a good spot so left it out.


I went searching through my Christmas stamps and found the perfect set - My Monthly Hero from November 2019.  I stamped, coloured and die-cut the chair, tree and gift and set them aside to work on the card base. 


For the card base, I masked off a section using 2" Post-It Tape and ink-blended some Weathered Wood Distress Ink at the top to try and mimic the wall colour in the photo, and some Pumice Stone ink at the bottom for the carpet.  I then arranged my elements, making sure to overlap them for cohesion and adhered them.  I used liquid glue for the tree and foam tape for the gift and the chair.  I stamped a sentiment that tied everything together nicely and finished with some clear sparkle pen on the ornaments and star.


Thanks so much for visiting.  Please head over to the Just Us Girls site and check out the fabulous cards made by the team.  And have a go yourself - so much wonderful inspiration in this photo.

Products used:

Stamps:  My Monthly Hero Nov 2019, Christmas Messages (Hero Arts)
Ink:  Amalgam (Gina K.) Versafine Onyx Black, Weathered Wood, Pumice Stone Distress Inks
Cardstock:  White, X-Press It
Dies:  MMH Nov 2019 (Hero Arts)
Accessories:  Copics, Spectrum Noir Clear Sparkle Pen

Cheers
Karren

Dark Snowy Night


 Hi and welcome to the last post for the Fusion challenge.  I have decided to close down the challenge after a year of to-ing and fro-ing on the decision.  For today's card I decided to focus on the black and white colour scheme and the snowman from the photo.


Firstly I stenciled some white embossing paste onto a black card panel over a snowfall stencil.  While that was drying, I coloured and fussy-cut the snowman and die-cut some snow-drifts.  Onto one of the snow drifts, I stamped the sentiment.  


I adhered the back snowdrift directly to the black panel and the foreground snowdrift and snowman were popped up on foam tape.


Thanks for visiting and a personal thank you to everyone who has played along in the Fusion challenges and the wonderful design team members over the years.

Products used:

Stamps:  Holiday Hugs Snowman, Hand Lettered Holiday (MFT)
Ink:  Amalgam (Gina K.), Versafine Onyx Black
Cardstock:  White, Black, X-Press It
Dies:  Snow Drifts (MFT)
Accessories:  Falling Snow Stencil (SSS), White Embossing Paste, Copics

Cheers
Karren

Thursday 24 November 2022

Hello Sunflower

 Hi! Today’s sketch over at Freshly Made Sketches was designed by Jen Brum and here’s my card.


I am a bit over making Christmas cards so decided to put a NBUS stamp set to work. I stamped and Copic-coloured this beautiful sunflower stamp. I kept the rest of the card fairly clean with an embossing folder to add a bit of interest.


The sentiment is hot-foiled to add a bit of shine.  A few enamel dots as embellishments and my card was done.


Thanks so much for visiting. Please check out the gorgeous work by the rest of the design team.

I'm linking this up to The Flower Challenge where they are looking for embellishments.


Products used:
Stamps:  Hello Sunflower (Spellbinders)
Ink: Amalgam (Gina K.)
Cardstock:  White, Daffodil (MFT), X-Press It
Dies:  Modern Greetings 1 (Poppystamps)
Accessories:  Copics, Origami Folds Embossing Folder (Spellbinders), Gold Hot Foil, Enamel Dots

cheers
Karren


Saturday 19 November 2022

Rich Poinsettia

Hi all!  I'm here with my third card as guest designer at Just Us Girls challenge and this week is Color Week, where we've been give the colours of red, green and gold.  

I went the very obvious route and created a Christmas card 😄


I gold-embossed the background stamp onto white and cut a panel which I then adhered to an Amarena Cherry card base, adding a thin strip of gold matte foil cardstock down the right hand side.  The sentiment was gold-embossed onto the card base and once that was done, I set to work on the poinsettia.


I die-cut the pieces and sponged the edges with Cranberry Fizz ink before splattering on some gold shimmer spray.  Once that was dry, I curled the edges of each petal and glued each piece together before adding some gold pearls to the centre.  For the leaves, I sponged Eucalyptus ink around the edges but didn't splatter them.


Thanks for visiting!  The design team are sure to have some gorgeous cards using this colour combo so head on over and check them out and play along!

Products used:

Stamps:  Outline Winter Floral (SSS), Poinsettia Bouquets (WPlus9)
Ink:  Versamark, Cranberry Fizz, Eucalyptus (Catherine Pooler)
Cardstock:  White, Amarena Cherry, Jellybean Green (MFT), Gold Matte Foil
Dies:  Layered Poinsettia (Spellbinders)
Accessories:  Gilded Embossing Powder (Brutus Monroe), Gold Shimmer Spray, Gold Pearls

Cheers
Karren

25

 Hi and welcome!  As I mentioned earlier in the week, I have had this week off work and as well as catching up with a few friends, I spent a bit of time stamping and it was wonderful!  Today is Saturday and Monday I'm back to work so I wanted to play along in a last few challenges before then.

This card evolved over the course of a few hours and as I was part-way through making it, I thought it would make a perfect birthday card for my late son, Matthew, who would be 25 next month.  I was firstly inspired by the latest Tic Tac Toe challenge and my eye was drawn to the word "Rust" and I immediately decided I wanted to try and re-create the rust patina on old cars.  Matthew loved cars and I know he'll love this card, even though there isn't a car on it.


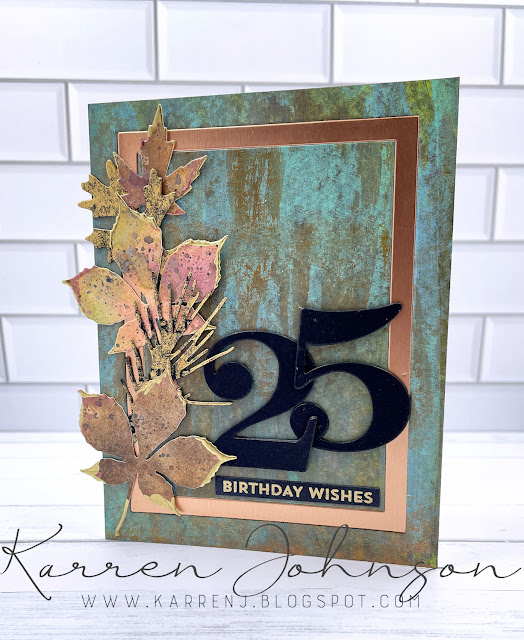
To create the background, I went back to an old video of mine where I showed a technique I'd learned about 15 years ago, now.  Here's a link if you want to see how I made the background and here's how the background looked once it was finished.  I started with a panel of black cardstock and added Distress Paints in the following order (the video will make more sense of what I'm about to write):  Antiqued Bronze, Twisted Citron (spritzed), Antiqued Bronze, Broken China (spritzed), Cracked Pistachio (spritzed), Antiqued Bronze (sparingly).


From there, I had to decide how to use the panel and I came up with the idea of adding leaves down the left hand side, the number 25 to represent how old he would be and an inlaid metallic frame.  The leaves were die-cut from distress inked panels that were in my stash so I don't know the colours.  Once I'd cut them, I added some Foundry Wax in both Mined and Gilded to the edges and heat set it.  


Two of the leaves were die-cut from a failed hot-foiled panel where I'd tried to use the solid hot foil plate after foiling a whole lot of sentiments.  It was a failure but I kept the panel because I could use the back.  However, I decided to use the front and I love how it came out.  There's a photo of what's left of the panel and a close-up of the leaves I cut from that panel.  I even left the letters in.


Thanks so much for visiting.  I have to say I absolutely love this card, and not only because of what and who it represents.  I'm a CAS card-maker so to dabble in these different products is unusual for me.

I'm also linking this card to the Many of Something challenge at Seize the Birthday (my second entry), the Four Seasons Fall challenge, Tic Tac Toe Challenge (Rust/Free/Any Shape Die) and the Happy Little Stampers Birthday and Dies Challenges.


Products used:

Stamps:  Bitty Birthday Wishes (MFT)
Ink:  Versamark, various Distress and Distress Oxide inks
Cardstock:  White, Black, Rose Gold Matte Foil
Dies:  Nesting Rectangle Frames (Waffle Flower), By the Numbers (PTI), Leaves Die (Impression Obsession), Fall Foliage (Tim Holtz)
Accessories:  Distress Paint (Antiqued Bronze, Twisted Citron, Broken China, Cracked Pistachio), Foundry Wax (Mined, Gilded), Gilded Embossing Powder (Brutus Monroe)

Cheers
Karren

Edited to Add:  This card got a shout out at Seize the Birthday and Tic-Tac-Toe